Match via Firebase
Match via Firebase
Match information available through the Match API endpoint, automatically updated and delivered to your Firebase backend in real-time.
Configuring your Console
Step 1: Access Service Account Permissions
- Go to your Firebase Console.
- Click on the settings icon (usually a gear or cogwheel) which is right next to the "Project Overview" option in the sidebar to access Project Settings.
- In Project Settings, click on the "Service Accounts" tab.
- Locate and click on the blue, interlinked "Manage service account permissions" option within the Service Accounts settings.

Step 2: Create Service Account and Assign Permissions
- Click on "+ CREATE SERVICE ACCOUNT" button.
- Enter a Service account name. The Service Account ID is auto-generated; add an optional description if needed.
- Under "Grant this service account access to project" section, select "Firebase Admin SDK Administrator Service Agent" from the dropdown list under the Role.
- After completing these steps, click "Done" to set up your service account with the required permissions for integration.

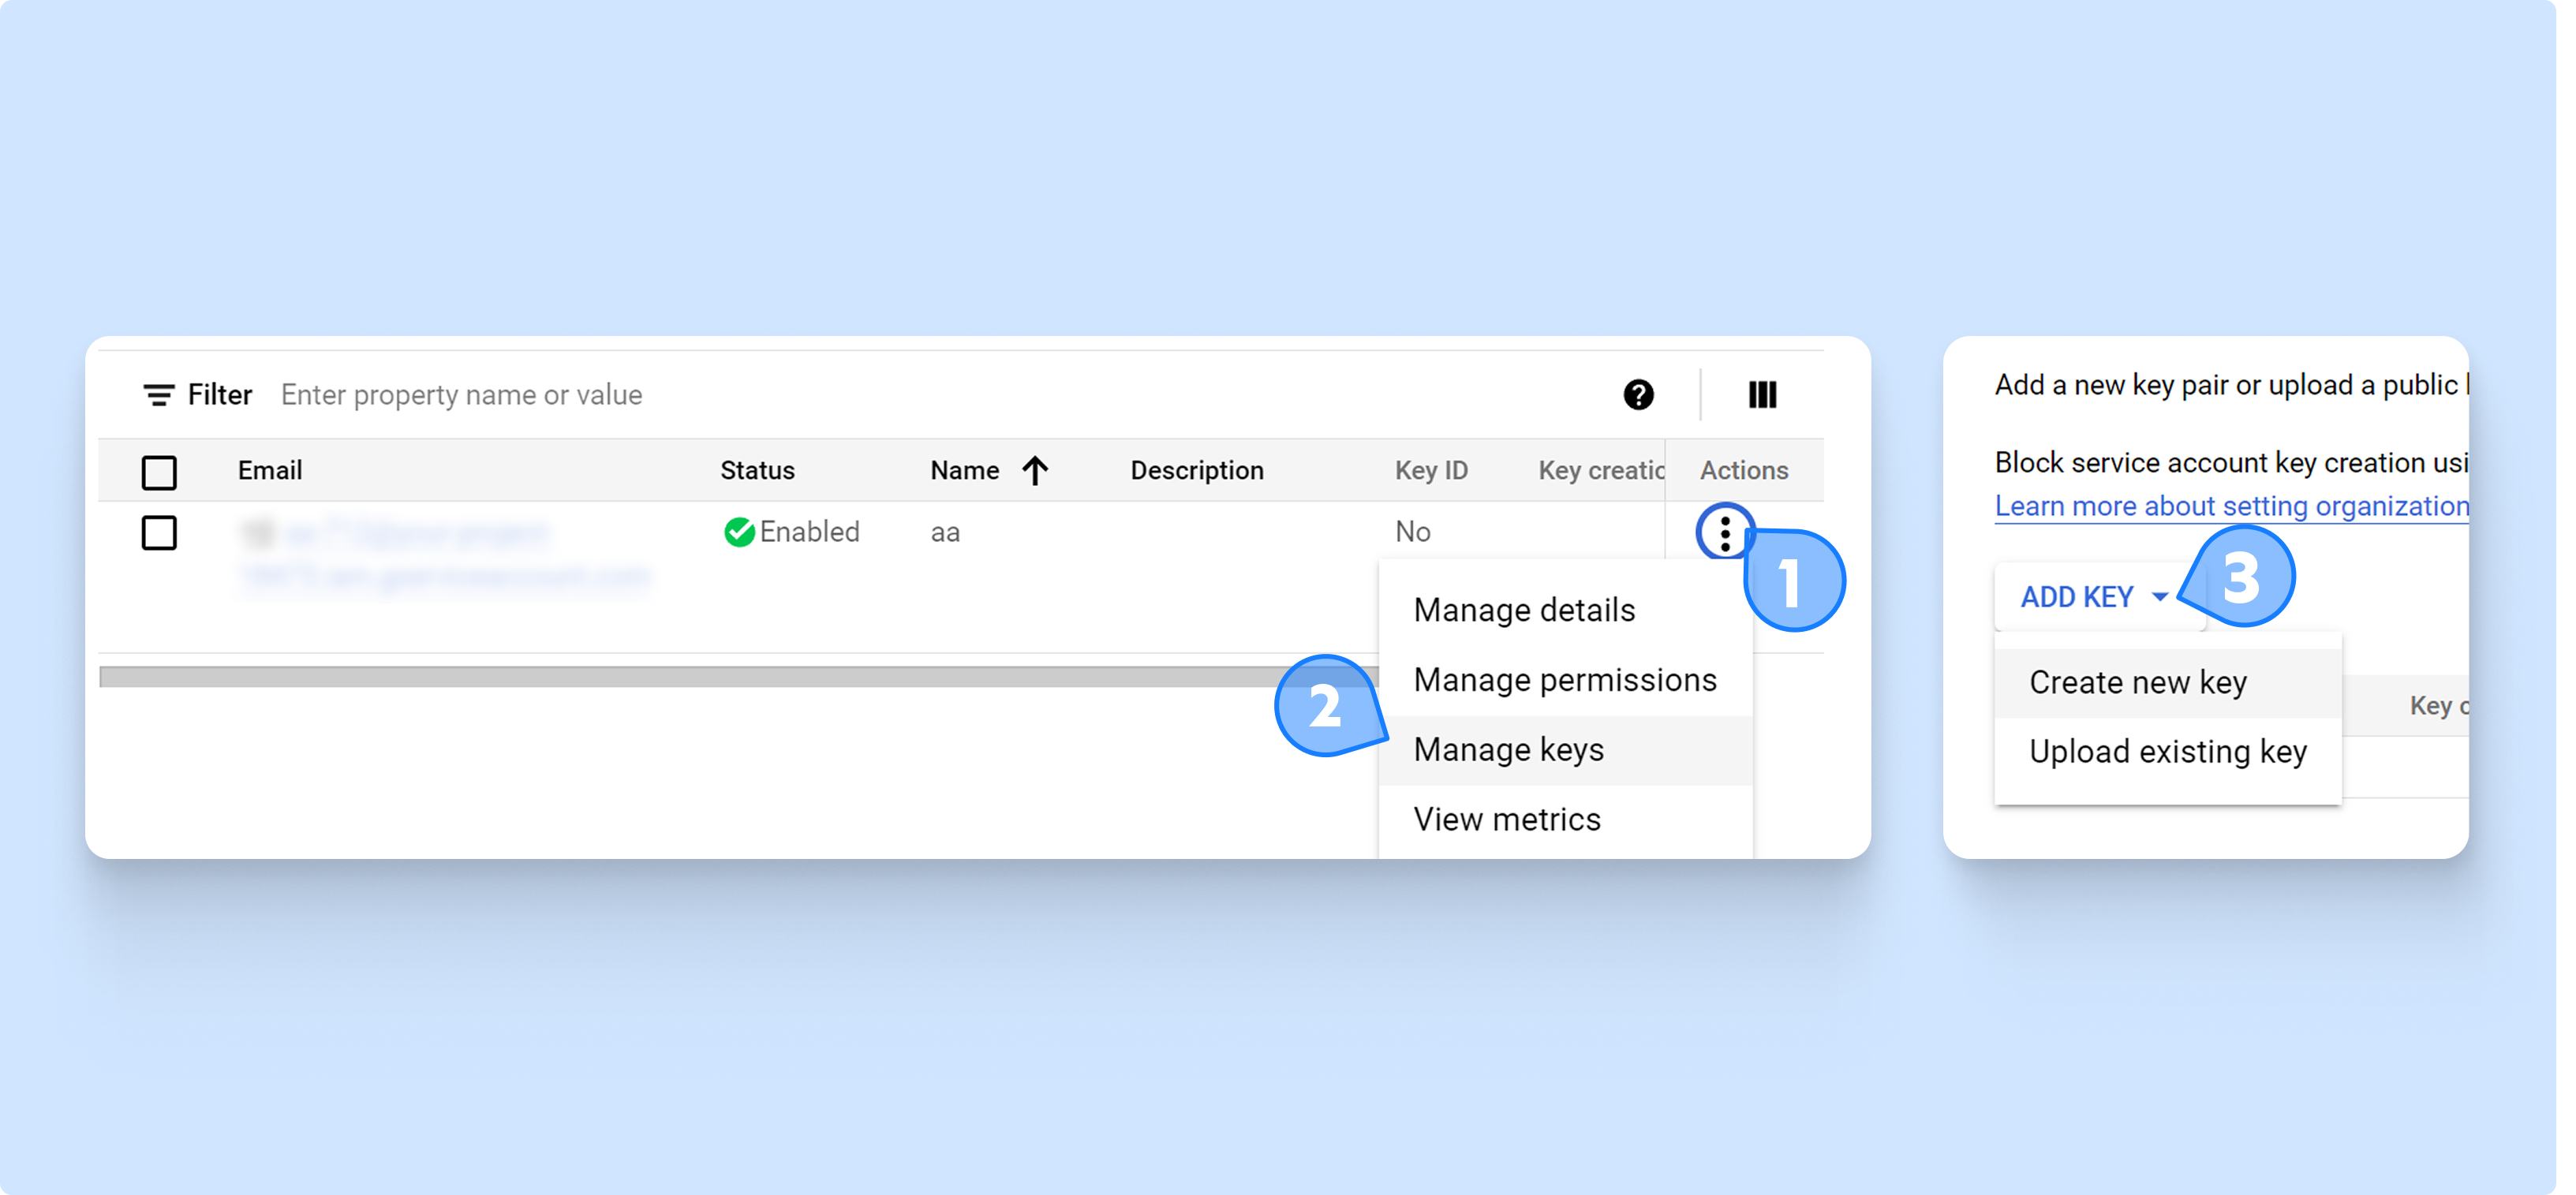
Step 3: Generate JSON Key
- In the Filter table, find your Service account.
- Under the Actions column, click the options button (three vertical dots).
- From the dropdown, select "Manage Keys" to open a new page.
- On the new page, click "Add Key", choose "Create New Key" from the dropdown, and in the ensuing pop-up, select the Key type as JSON. A JSON file will be downloaded to your system.
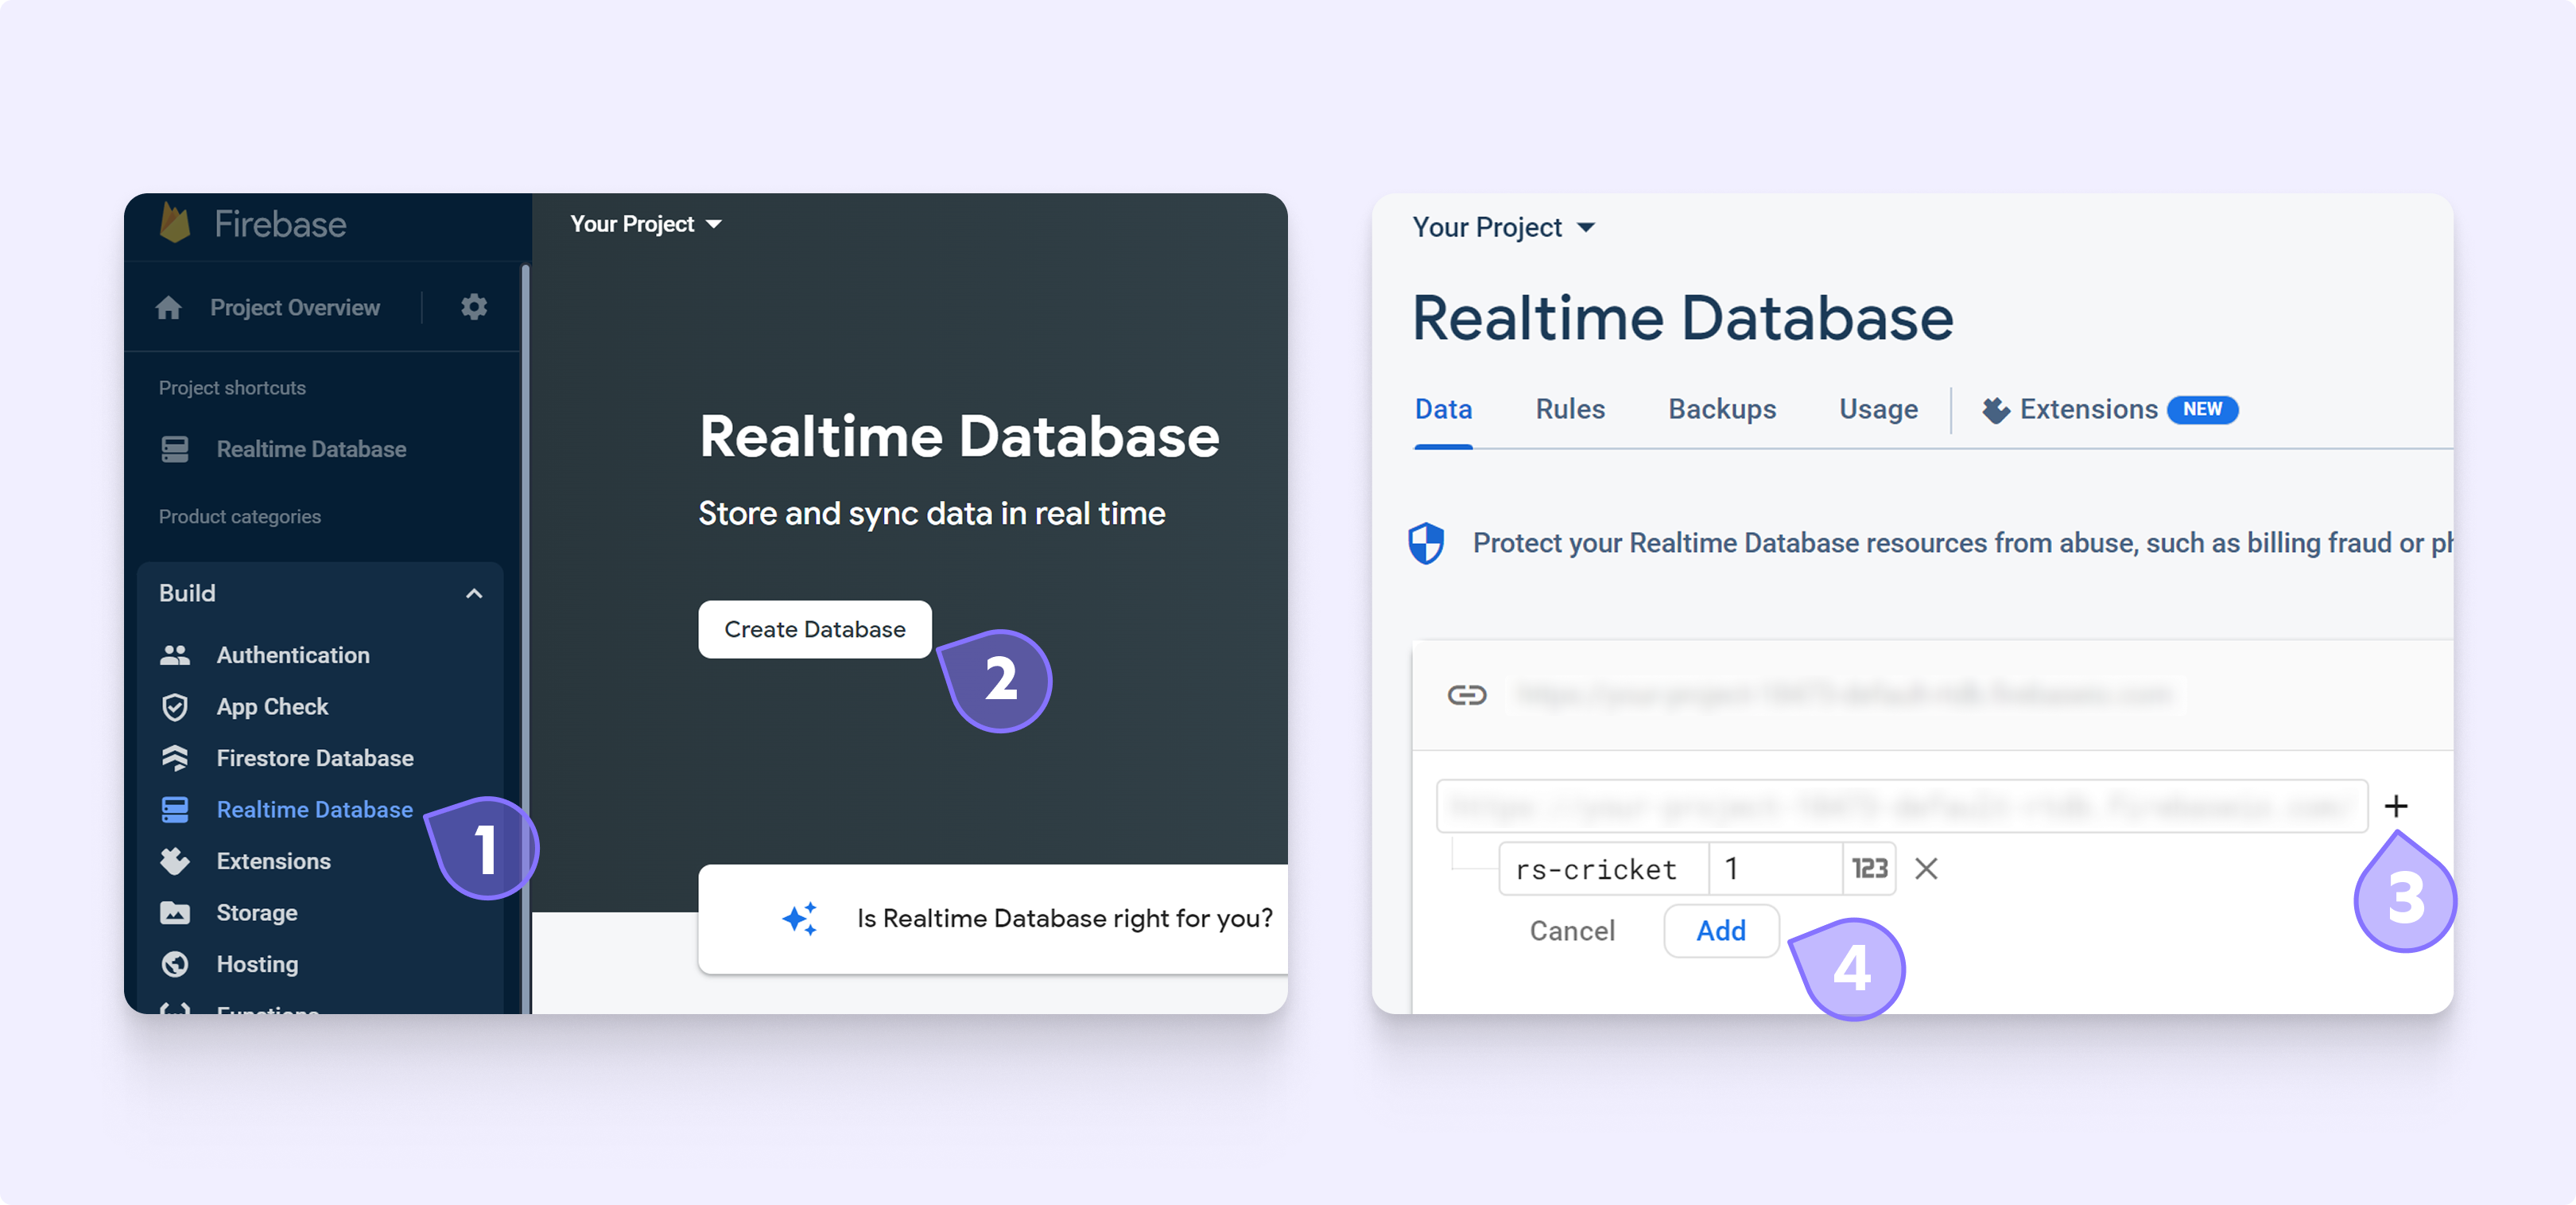
Step 4: Creating a Node
- Return to the Firebase Console.
- In the sidebar under "Build," select "Realtime Database."
- Click "Create Database".
- In the popup, choose "Start in Locked Mode."
- You'll be directed to the Realtime Database interface.
- Under "Data," create a node by hovering over the link's right corner, click ‘+’ symbol, and add the node named "rs-cricket" with a value of 1 for us to push data.
- Click "Add".
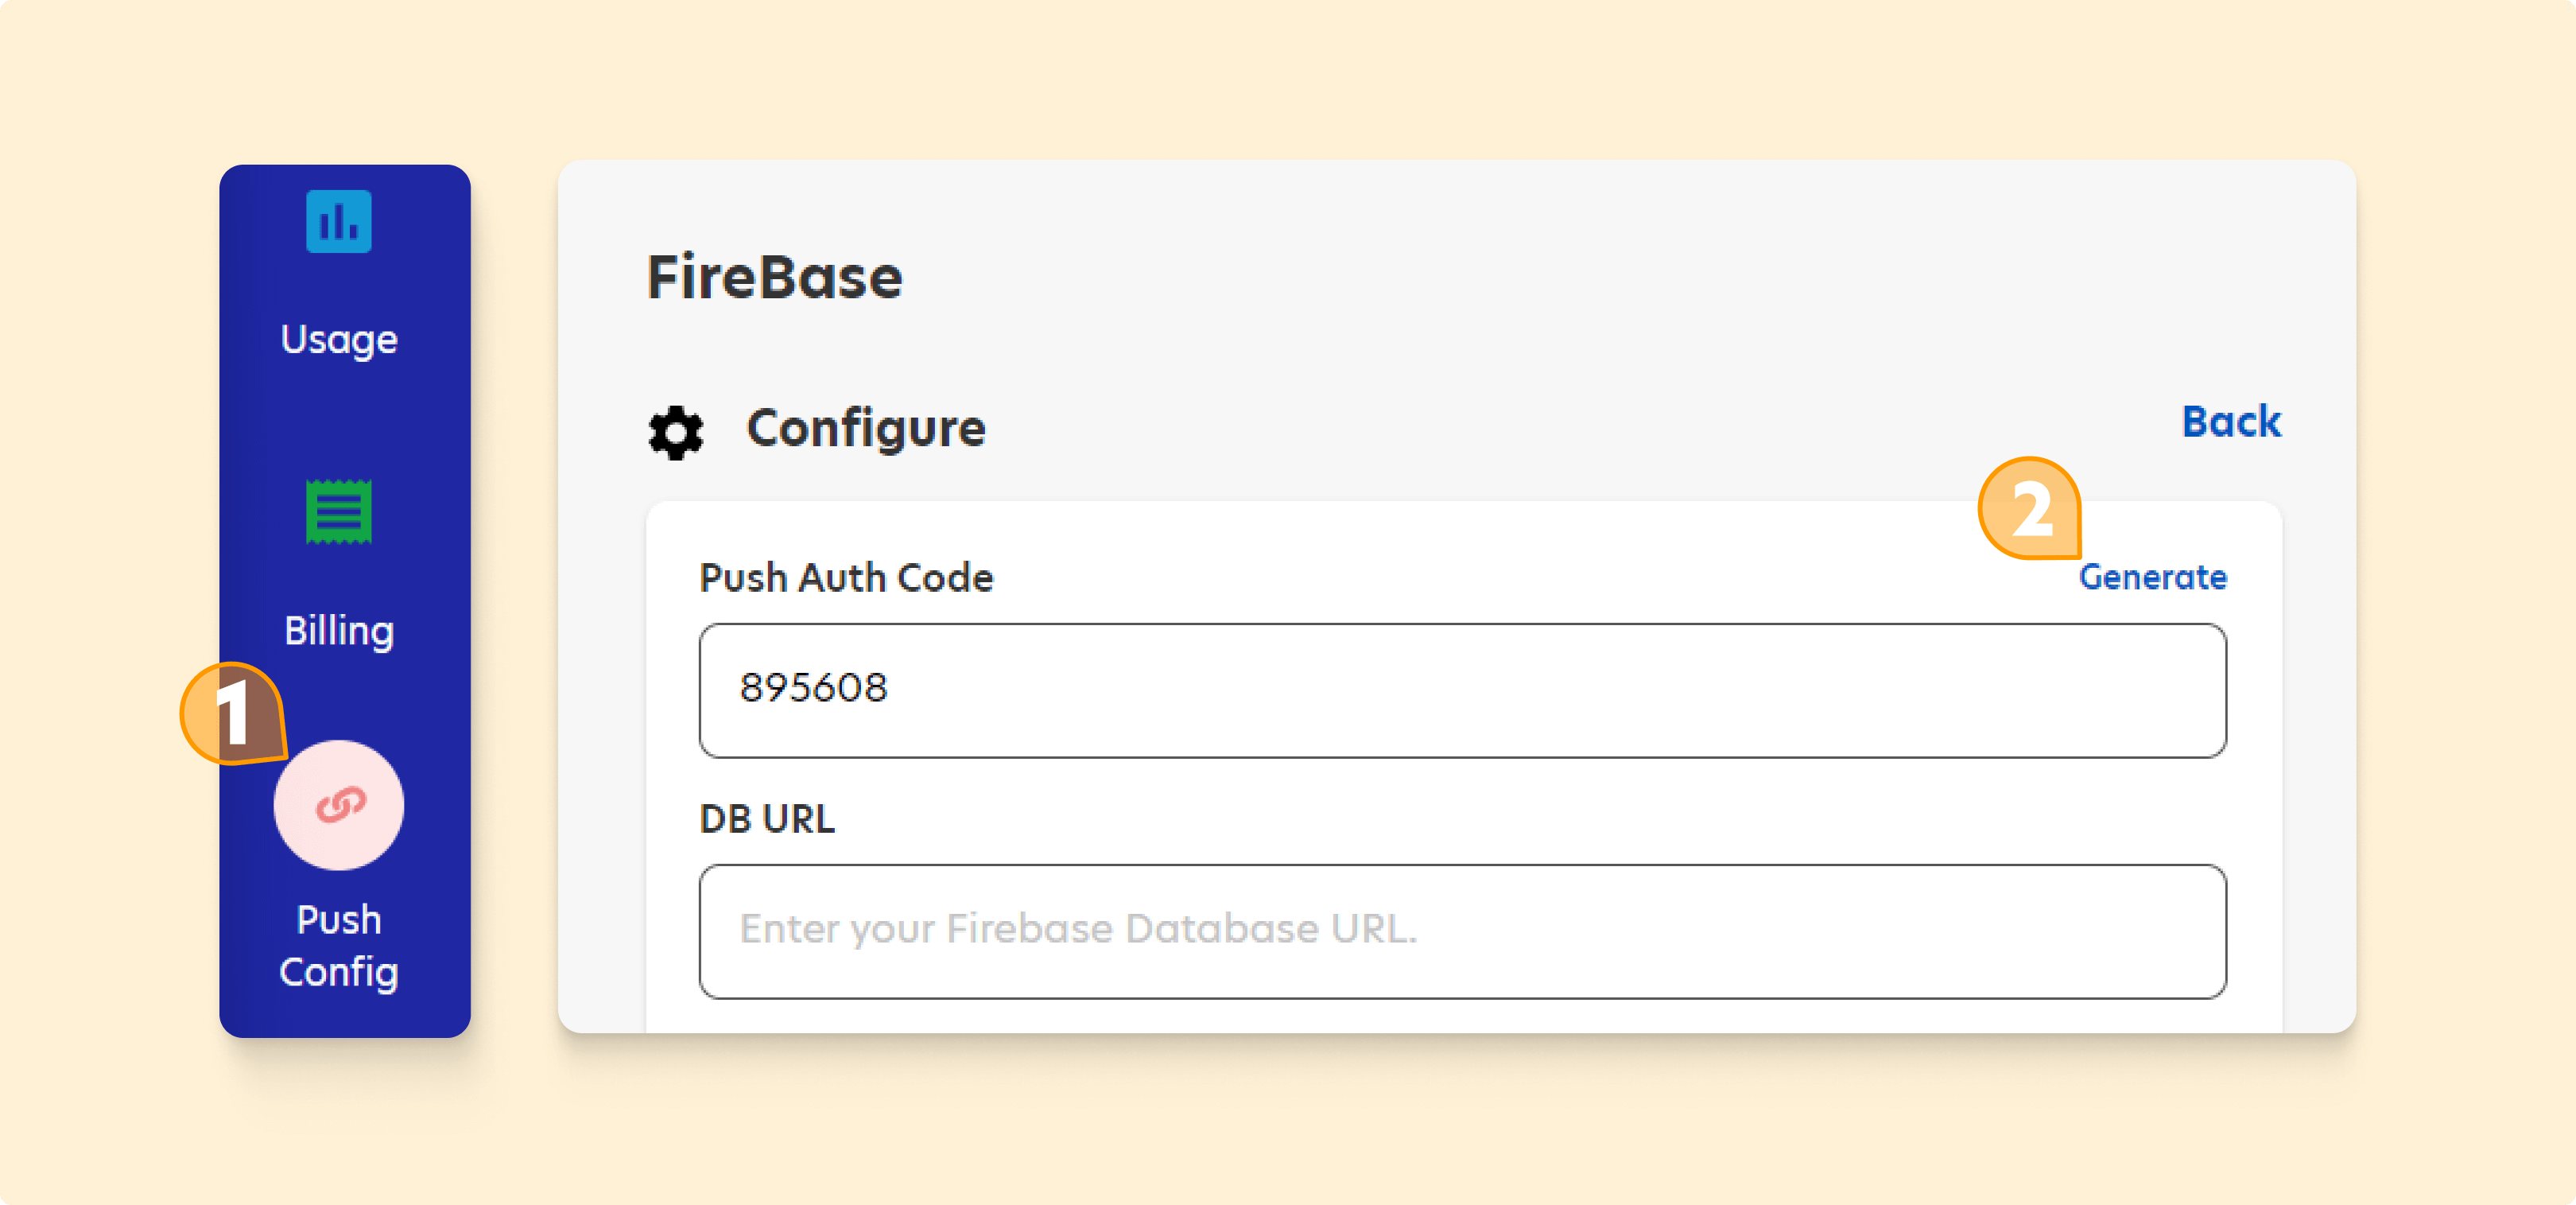
Step 5: Generating Push Auth Code
- Open a new browser tab and go to your Roanuz Console.
- In the sidebar, click on "Push Config," then select "Firebase" by clicking "Configure" under "Live Match Push Delivery."
- In the Firebase page, click "Generate" next to the Push Auth Code field.
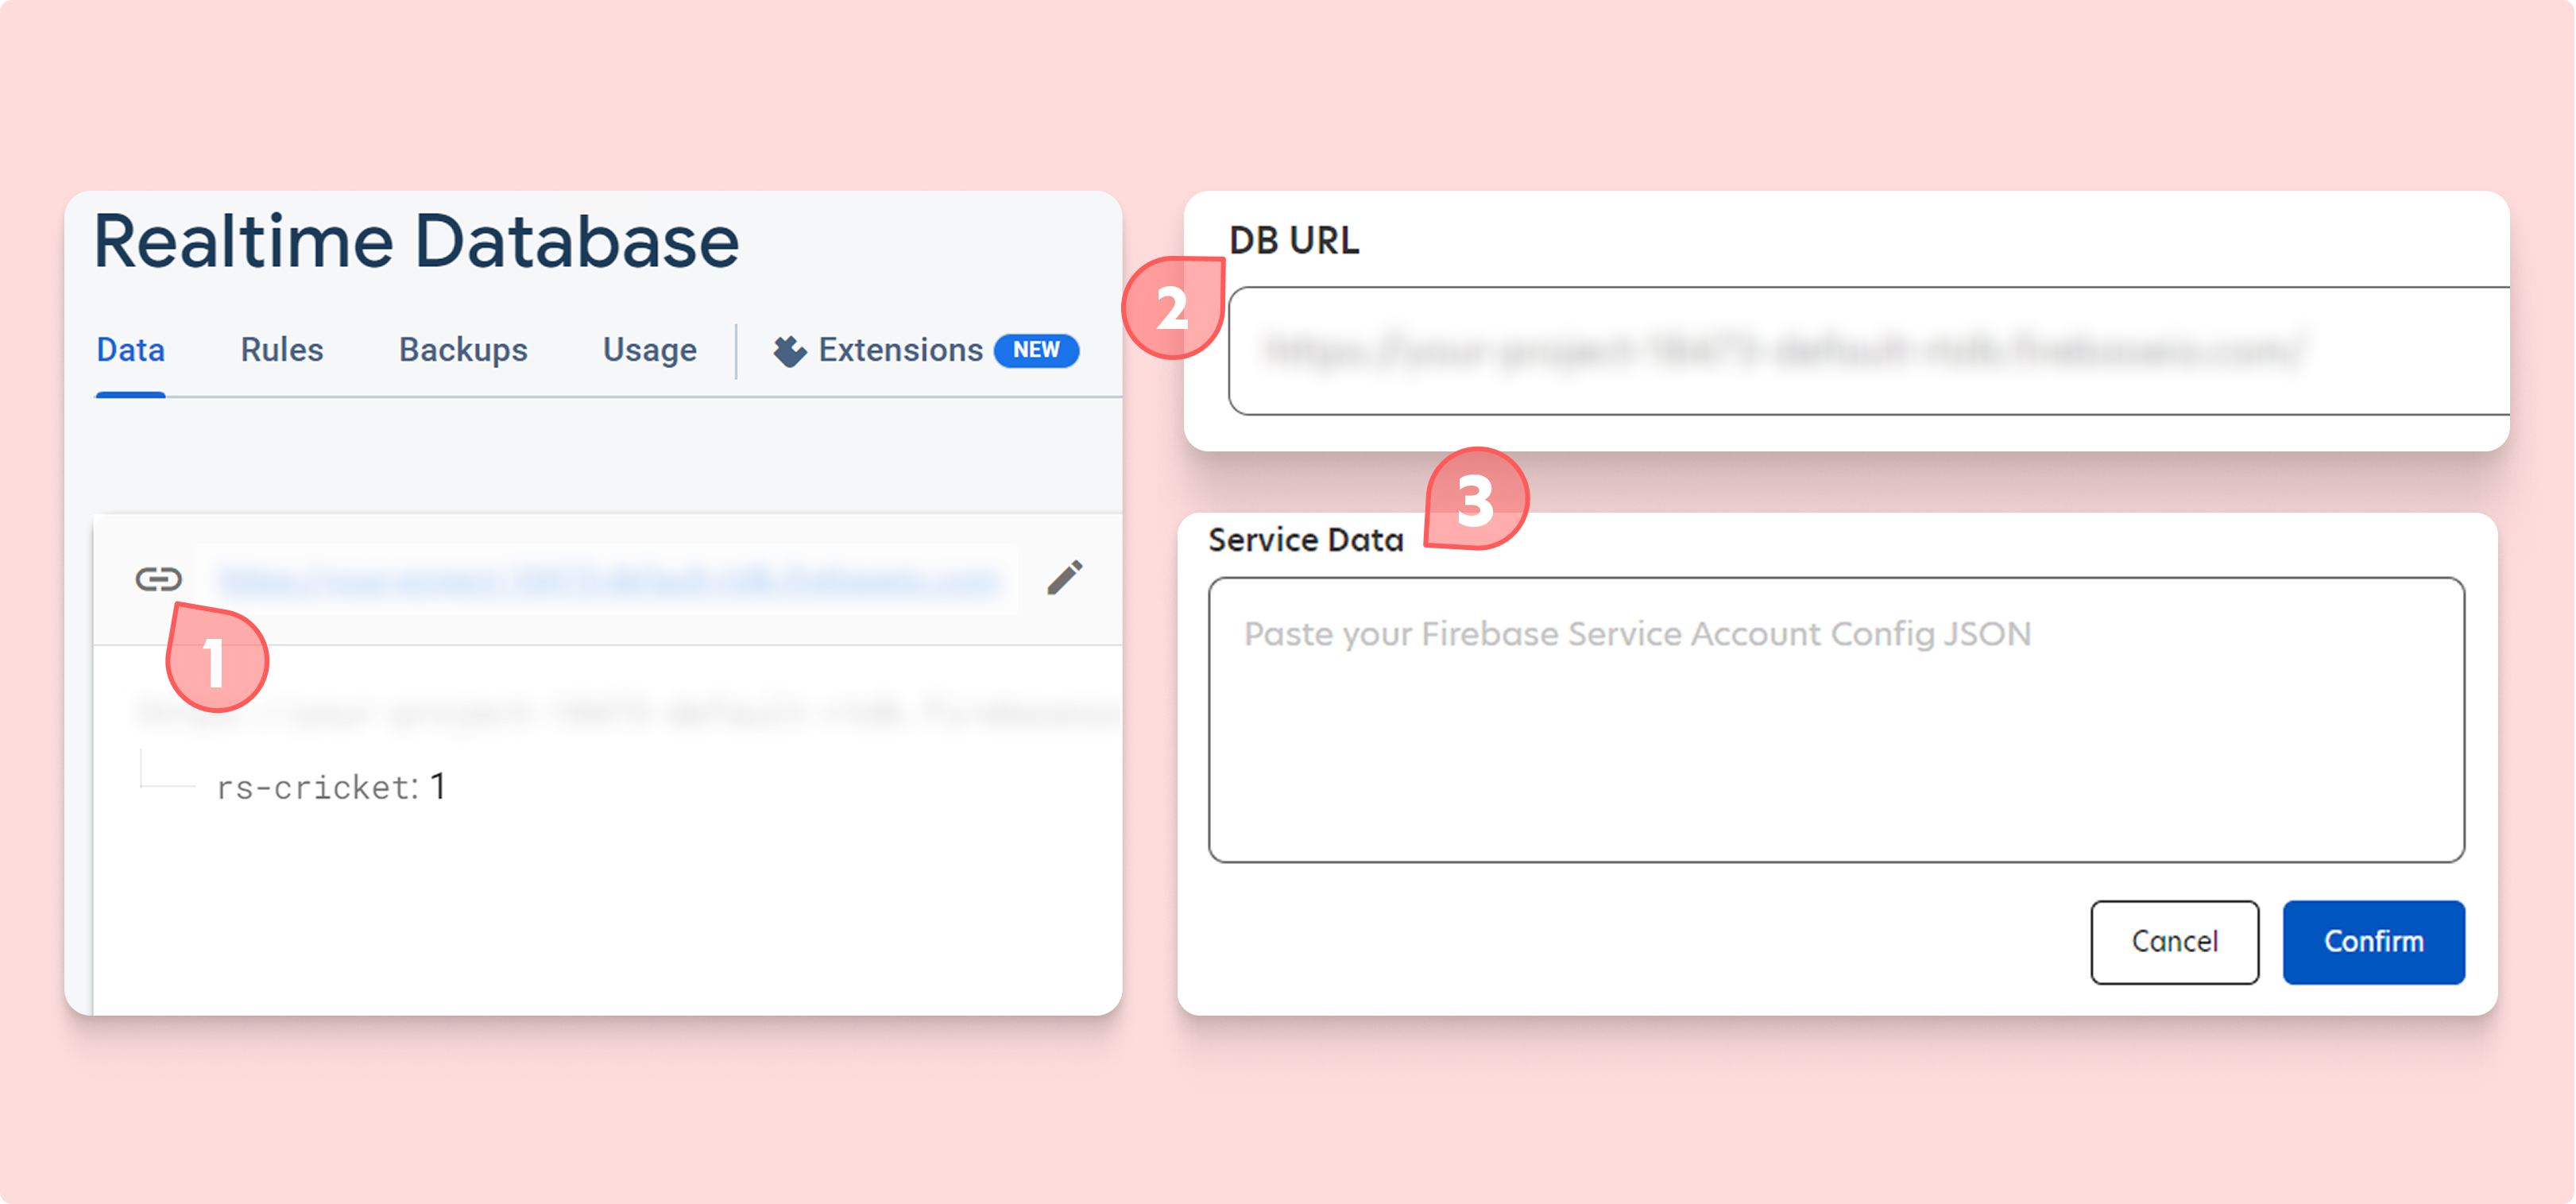
Step 6: Configuring Firebase Integration
- After completing Step 5, go to your Firebase Console.
- Click on the 🔗 icon to copy your Firebase Realtime Database URL.
- Return to the Cricket API Console and paste the copied URL into the "DB URL" text box.
- In the "Service Data" text box, paste the contents of the JSON file downloaded in Step 3.
- Click "Confirm" to save the configuration.
Step 7: Updating Realtime Database Rules
- In your Firebase Console, navigate to the "Rules" tab of your Realtime Database.
- Replace the existing snippet with the following:
- Make sure to replace
MY_PUSH_AUTH_CODEwith the Push Auth Code you generated in Step 5. - Click "Publish" to save the updated rules.
 Copy and paste this to subscribe and receive automatic match updates. Make sure to replace the Push Auth Code as mentioned in Point 3 of Step 7
DB rules
{
  "rules": {
    ".read": false,
    ".write": false,
    "rs-cricket": {
      ".read": "auth.uid === 'rs-cricket-user-MY_PUSH_AUTH_CODE'",
      ".write": "auth.uid === 'rs-cricket-user-MY_PUSH_AUTH_CODE'"
    }
  }
}
{
"rules": {
".read": false,
".write": false,
"rs-cricket": {
".read": "auth.uid === 'rs-cricket-user-MY_PUSH_AUTH_CODE'",
".write": "auth.uid === 'rs-cricket-user-MY_PUSH_AUTH_CODE'"
}
}
}- Now, click on Publish. You are now all set to subscribe and receive automatic match updates.
Sending a Subscription Request
You have to subscribe to the matches individually for receiving automatic updates. The Sample snippet below demonstrates how to send a subscription request. Please note that subscribing twice to the same match does not mean that you will be charged twice, or you will receive the same update twice.
Match Subscribe - Firebase
TERMINAL
pip install requests
pip install requestsmatch_subscribe_firebase.py
import requests

project_key = 'YOUR_PROJ_KEY'
token = 'YOUR_ACCESS_TOKEN'
match_key = 'ausind_2020_odi01'
url = "https://api.sports.roanuz.com/v5/cricket/{}/match/{}/subscribe/".format(project_key,match_key)
headers = {
    'rs-token': token
}
payload = {
    'method': "google:firebase"
}
response = requests.post(url, headers=headers, json=payload)

print(response.json())
import requests
project_key = 'YOUR_PROJ_KEY'
token = 'YOUR_ACCESS_TOKEN'
match_key = 'ausind_2020_odi01'
url = "https://api.sports.roanuz.com/v5/cricket/{}/match/{}/subscribe/".format(project_key,match_key)
headers = {
'rs-token': token
}
payload = {
'method': "google:firebase"
}
response = requests.post(url, headers=headers, json=payload)
print(response.json())Handling the data received
Once successfully set up, Roanuz Cricket API servers will automatically start pushing data to your Firebase Realtime Database as the match progresses. You can easily include the data in your application by using the Firebase APIs.
Unsubscribing from a Match
For any reasons, if you wish to opt-out of receiving automatic updates for a match, you can do so by placing an unsubscribe request from the Match Unsubscribe API.
Match Unsubscribe - Firebase
TERMINAL
pip install requests
pip install requestsmatch_unsubscribe_firebase.py
import requests

project_key = 'YOUR_PROJ_KEY'
token = 'YOUR_ACCESS_TOKEN'
match_key = 'ausind_2020_odi01'
url = "https://api.sports.roanuz.com/v5/cricket/{}/match/{}/unsubscribe/".format(project_key,match_key)
headers = {
    'rs-token': token
}
payload = {
    'method': "google:firebase"
}
response = requests.post(url, headers=headers, json=payload)

print(response.json())
import requests
project_key = 'YOUR_PROJ_KEY'
token = 'YOUR_ACCESS_TOKEN'
match_key = 'ausind_2020_odi01'
url = "https://api.sports.roanuz.com/v5/cricket/{}/match/{}/unsubscribe/".format(project_key,match_key)
headers = {
'rs-token': token
}
payload = {
'method': "google:firebase"
}
response = requests.post(url, headers=headers, json=payload)
print(response.json())